
Water Heater Bypass
If you just got a new or used Roadtrek you may still be a bit baffled by
the winterization process. It
really isn’t hard, but the process varies a bit with the various models
and years. But one of the questions
that always comes up is the Water Heater Bypass. If a bypass was installed on your water
heater, the winterization process is much easier. If you don’t have one, I would
recommend getting one. Any RV can
install one if you don’t want to tackle it yourself.
But your new-to-you Roadtrek
might already have one installed.
How do you know? And how
does it work?
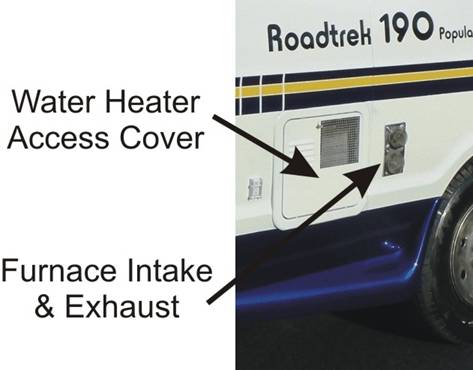 Step 1: Find your
Water Heater. The locations varied
over the years, so the easiest way to see where it is located is by looking at
the outside of your van. It has a
large cover over it with a square screen in the upper right corner. The other vents you can see in the photo
are for the furnace.
Step 1: Find your
Water Heater. The locations varied
over the years, so the easiest way to see where it is located is by looking at
the outside of your van. It has a
large cover over it with a square screen in the upper right corner. The other vents you can see in the photo
are for the furnace.
Behind this panel is the anode that you will need to remove to drain the
tank for winterizing. It should
also be checked yearly and replaced if too far gone. You will need a 1-1/16 (1 and 1/16 inch)
socket for the anode rod. Buy one
if you don’t have one.
 Step 2: Now that you know where the water heater
is located, go inside your Roadtrek and figure out how to access it from the
inside. It may be behind a door or
you may have to remove an access cover to reach it.
Step 2: Now that you know where the water heater
is located, go inside your Roadtrek and figure out how to access it from the
inside. It may be behind a door or
you may have to remove an access cover to reach it.
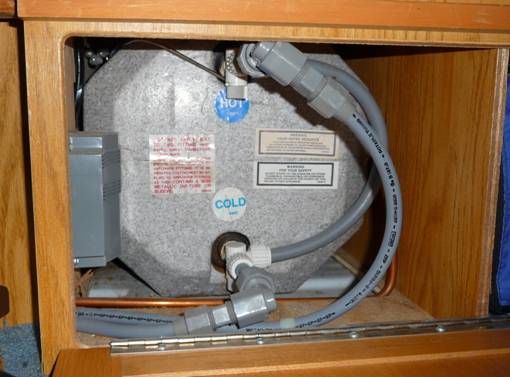
In Red Rover the water heater shares a door with a storage area to the
rear of it.
Notice that the Hot Water line comes out of the top of the tank (heat
rises) and the cold water goes in the bottom of the tank.
These are standard Suburban 6 gallon RV hot water heaters.
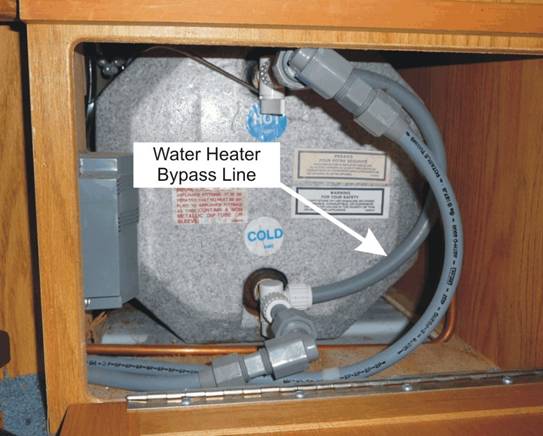 Step 3: Indentify the existence of a bypass
kit. If you have a water heater
bypass you will have a pipe with valves on it running directly from the Cold
input line to the Hot output line.
Step 3: Indentify the existence of a bypass
kit. If you have a water heater
bypass you will have a pipe with valves on it running directly from the Cold
input line to the Hot output line.
Here you can clearly see the added on white valves of the bypass kits and
the loop of water line that connects the cold to the hot.
This kit was added by a previous owner to simplify the winterizing
process. Without a bypass kit it is
necessary to completely fill the 6 gallon water heater tank with RV
antifreeze. Using a bypass kit
allow you to winterize with 1 to 2 gallons of RV antifreeze.
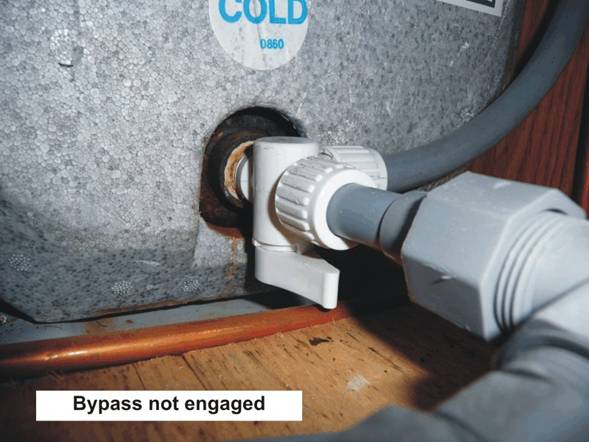 Step 4: Valve Positions. The lever on the valve will point
in the direction the water will flow.
In this case the water will not go into the bypass line, but into the
water heater instead.
Step 4: Valve Positions. The lever on the valve will point
in the direction the water will flow.
In this case the water will not go into the bypass line, but into the
water heater instead.
If the valve is turned 90 degrees (toward the bypass line) the water will
flow into the bypass line and not into the water tank.
The copper line is the gas supply for the water heater.
 Step 5: Upper Valve. The upper valve is parallel to the hot
water line – the bypass has not been engaged - the water will exit the
heater and flow into the Roadtrek hot water lines.
Step 5: Upper Valve. The upper valve is parallel to the hot
water line – the bypass has not been engaged - the water will exit the
heater and flow into the Roadtrek hot water lines.
If the valve is turned toward the bypass line, the flow will be from the
bypass line to the hot water line.
Both valves must be turned to the water to bypass the water heater tank
and to flow into the hot water lines.
With the bypass valves turned you will be able to pour RV antifreeze (aka
“the pink stuff”) into your previously emptied fresh water tank and
pump it through all your water lines.
Nothing will enter the hot water tank and you can drain it for the
winter.
It is also advisable to remove
the fuse for the water heater so you do not accidently turn it on while the
tank is empty. We’ve done it,
and the heat shuts off pretty quickly, but we don’t recommend it.
There is more to winterizing than just the water heater, but bypassing
the water heater can save you money and time in winterizing. It is good to make a list for
winterizing. It is easy to forget
the city water valve and the macerator (if you have one).