
Installing a Trimetric Battery
Monitor
The idiot light panel is almost (but not quite) worthless for monitoring
the condition of your house battery or batteries. It uses voltage levels to change the
color of the lights. You can use a
volt meter to do a slightly better job, but the problem is that unless the
battery is sitting with no load for a period of time, the reading will not be
accurate. And your battery always
has some load unless you have disconnected it.
You can use a hydrometer and check each cell for an accurate reading, but
that is a pain, and impossible if you have sealed batteries. The easiest way to keep track is a
battery monitor that does more than measure voltage. After reading up on the options, we
settled on the Trimetric. It was
said to be easier to set up and use than monitors of similar capability.
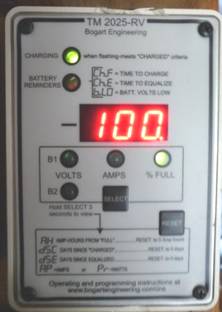
We got our Trimetric 2025RV from Randy at www.BestConverter.com. Randy is very helpful answering
questions and giving advice.
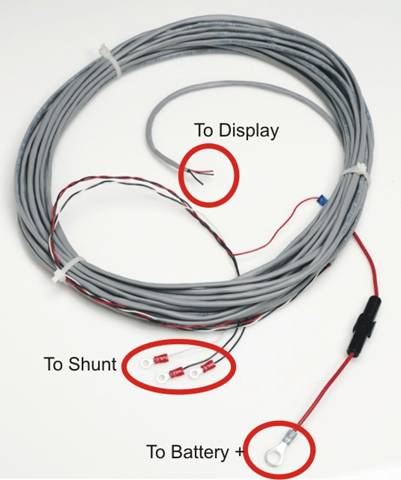
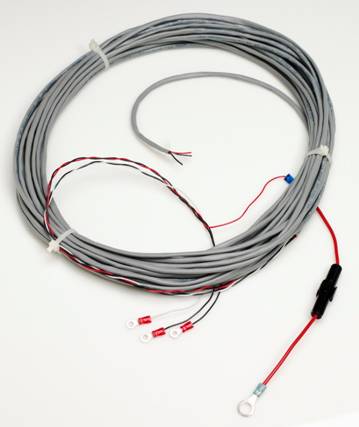 The
Trimetric comes with a display unit, a shunt, and a very long cable. And a lot of instructions.
The
Trimetric comes with a display unit, a shunt, and a very long cable. And a lot of instructions.
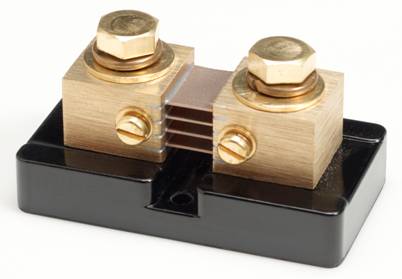
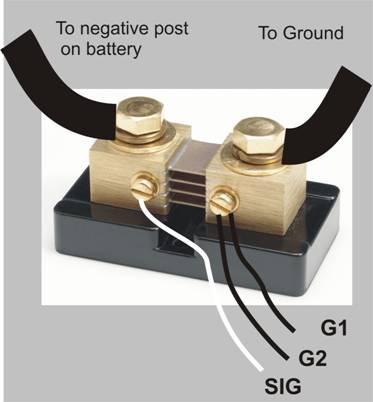
The shunt looks intimidating, but it is not hard to install. The shunt is necessary to get current
readings.
The cable is long enough for the
largest Class A, we just left the excess coiled up in a storage compartment.
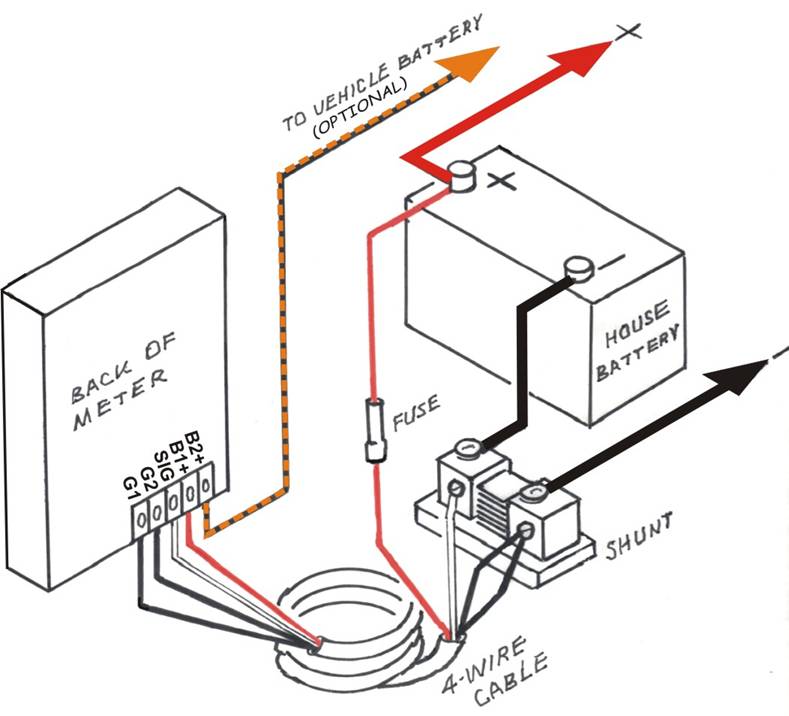
We found the wiring diagram for
the Trimetric to be rather confusing, so we later drew our own version of it to
hopefully be a bit clearer than the one with the instructions:
 Step 1. Find a
place near the battery to install the shunt. Depending on the location of your
battery (or batteries) this may be easy or difficult. In our case there was room just outside
the battery compartment which is a vented compartment under the driver’s
side dinette seat. We drilled two
holes for the cables.
Step 1. Find a
place near the battery to install the shunt. Depending on the location of your
battery (or batteries) this may be easy or difficult. In our case there was room just outside
the battery compartment which is a vented compartment under the driver’s
side dinette seat. We drilled two
holes for the cables.
These holes were later sealed so any battery gases would vent through the
proper vents rather than into the coach.
The radio rear speaker and the propane detector are also in this area.
 Step 2: The shunt is installed on the
negative side of the battery. That
means that the cable (or cables) currently going to the negative terminal (or
terminals) on the battery with go to one side of the shunt and you will add a
new cable from the other side of the shunt to the negative post on your
battery.
Step 2: The shunt is installed on the
negative side of the battery. That
means that the cable (or cables) currently going to the negative terminal (or
terminals) on the battery with go to one side of the shunt and you will add a
new cable from the other side of the shunt to the negative post on your
battery.
You will need to buy at least one additional length of battery cable to
go from the negative terminal on the battery to the shunt. If the negative cable currently going to
the battery is not long enough to reach the shunt, you will need to replace
it. Various lengths of battery
cables are available at auto parts stores and online. Measure to see how much you need. You should keep cables as short as
possible.
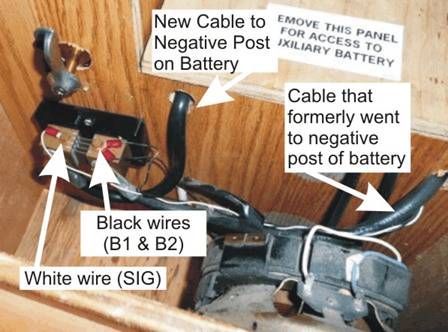
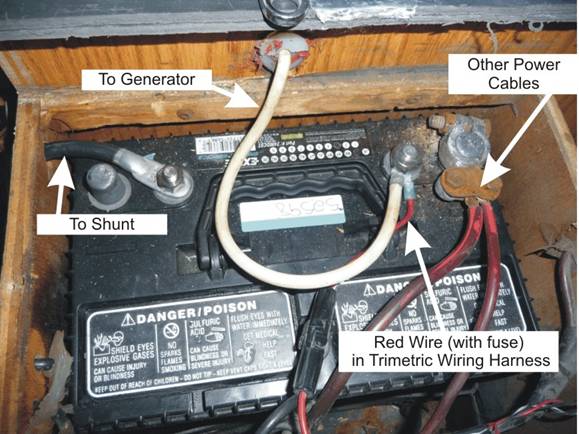 Inside the
battery compartment you can see the new cable for the shunt exiting the battery
box.
Inside the
battery compartment you can see the new cable for the shunt exiting the battery
box.
You can also see the red wire
from the Trimetric wiring harness attached to the positive terminal. (See Step 4). It is mounted to the same post as the
heavy white wire providing 12 volt power used for starting the Onan generator.
This is a Group 24 deep cycle
Exide battery. It is only 80 amp
hours.
 Step 3:
You will need to locate the display in some visible location. Pick a place it will be easy to run the
wiring harness to. We mounted ours
on the back of the pantry cabinet above the TV. You will have to drill one or more holes
to run the wiring harness
Step 3:
You will need to locate the display in some visible location. Pick a place it will be easy to run the
wiring harness to. We mounted ours
on the back of the pantry cabinet above the TV. You will have to drill one or more holes
to run the wiring harness
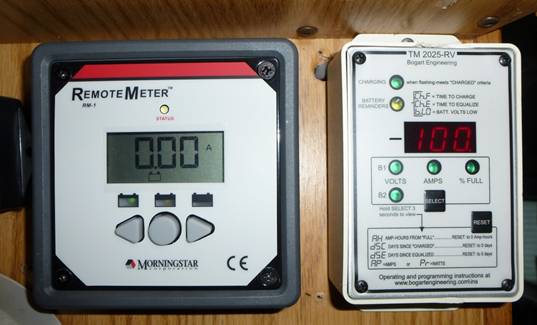
After adding a solar panel we put the monitor for the solar controller
next to the battery monitor. It is
very interesting to see the amps generated by solar and the amount going into
(or out of) the battery at the same time.
 Step 4: The diagram for the wiring is not as
complicated as it first appears.
There are 4 wires – one white, one red and two black. One end of the cable has connectors on
the wires. Remove the fuse before
connecting the wires.
Step 4: The diagram for the wiring is not as
complicated as it first appears.
There are 4 wires – one white, one red and two black. One end of the cable has connectors on
the wires. Remove the fuse before
connecting the wires.
1.
The red wire with the fuse and the big end goes to
the positive terminal of your house battery. So it needs to go inside the battery
compartment.
2.
The white wire goes to the small terminal on the
side of the shunt that connects to the negative battery terminal.
3.
Both black wires go to the small terminal on the
opposite side of the shunt.
Step 5: Route the wires to the display. This is probably the most time consuming
step – depending on where you located the display. Leave the extra wire coiled up somewhere
out of sight or shorten the cable if desired.
We fished the cable up from the dinette storage compartment behind the
wall panel into the pantry cabinet.
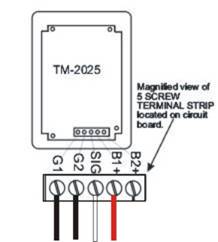 Step 6: At the Trimetric display the terminals
on the circuit board are labeled.
Step 6: At the Trimetric display the terminals
on the circuit board are labeled.
1.
The red wire goes to the B1+ terminal
2.
The white wire goes to the SIG terminal
3.
One black wire goes to the G1 terminal and the other
goes to the G2 terminal. It does
not matter which wire goes to which terminal since they both go to the same
side of the shunt
The B2+ terminal is extra – you can run a wire up to your engine
compartment if you would like to monitor the voltage on your engine
battery. It will not give any other
info other than voltage about this second battery
 Step 7: Check
your connections and then install the fuse. You now have to program the unit. It needs to know your battery’s capacity
and some other info in order for it to provide you with accurate
information. The basic required
information is P1, P2 and P3. P1
will be 14.4 volts (bulk charging voltage), and P3 will be the capacity of your
battery in amp hours. Ours is 80 amp
hours. If you are running two 6
volt Trojans you could be at 220 amp hours. P2 is computed from the other numbers as
the manual states. Entering these
values is a bit like figuring out how to set a new multi-function watch. You will likely mess it up a couple of
times before getting it right.
Step 7: Check
your connections and then install the fuse. You now have to program the unit. It needs to know your battery’s capacity
and some other info in order for it to provide you with accurate
information. The basic required
information is P1, P2 and P3. P1
will be 14.4 volts (bulk charging voltage), and P3 will be the capacity of your
battery in amp hours. Ours is 80 amp
hours. If you are running two 6
volt Trojans you could be at 220 amp hours. P2 is computed from the other numbers as
the manual states. Entering these
values is a bit like figuring out how to set a new multi-function watch. You will likely mess it up a couple of
times before getting it right.
Depending on what we are doing we may leave the display on % Full or we
may leave it on Amps (in or out).
You can display voltage and watts as well.
We have been very pleased with the usefulness of the Trimetric.