
Red
Rover’s Electrical & Electronic Mods
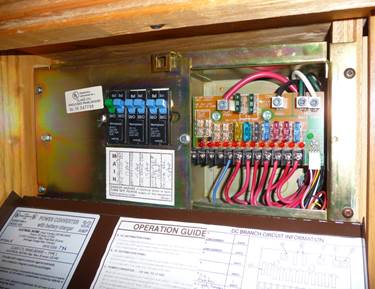
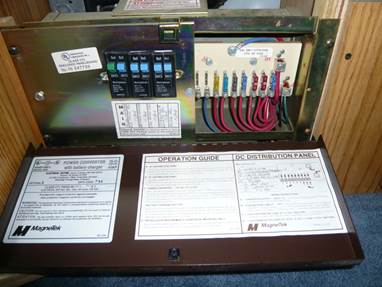
Left - Magnatek
Right – Progressive Dynamics 4600
upgrade
House Battery Charger and Converter. We
purchased a 4600 Progressive Dynamics from BestConverter.com upgrade to the Magnatek to get a three-stage battery charging to replace
the old two stage charging. This
prevents frying the battery due to overcharging. The upgrade is installed inside the
original Magnatek box, and does replace the fuse
panel (all 12 VDC circuits are filtered now). Also an LED lights if a fuse is
blown. Plus there is green LED that
indicates which mode the three-stage charger is using.
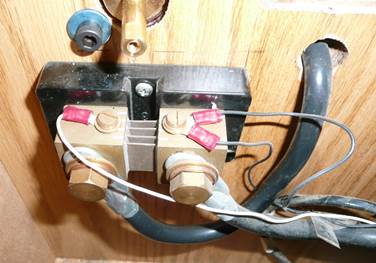
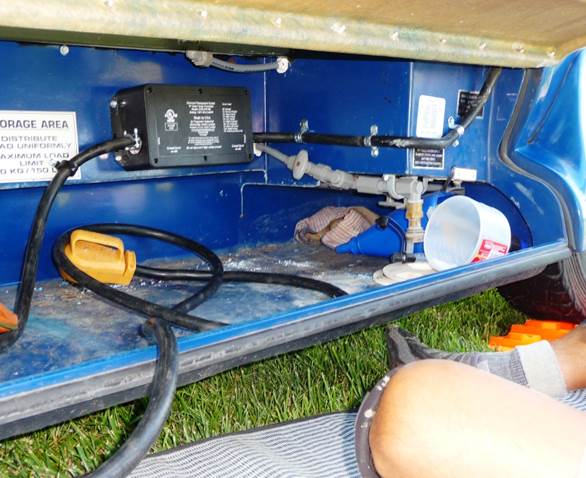
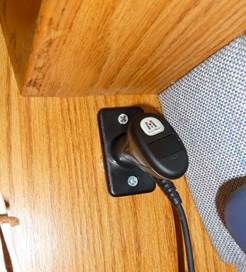
Installation is quite easy if you have a place to
install the shunt (photo on right) near the battery. Although it looks intimidating it is
rather simple. The shunt is
installed on the negative side of the battery and will require an additional
heavy duty battery cable. Ours is
installed on the outside of the battery compartment (see photo under Onan Generator for the bigger view).
 Shore Power Protection and Monitor. Dan Neeley, an itinerant electronic service technician and
Roadtrek owner, installed a Progressive Industries Power Protection unit for
us. It protects against a number of power issues. It shows the condition of plugged in
shore power at the pedestal. Digital error codes indentify
normal power and identify faults of various kinds, such as under voltage, over
voltage, reverse polarity, abnormal cycles, and surge suppression.
Shore Power Protection and Monitor. Dan Neeley, an itinerant electronic service technician and
Roadtrek owner, installed a Progressive Industries Power Protection unit for
us. It protects against a number of power issues. It shows the condition of plugged in
shore power at the pedestal. Digital error codes indentify
normal power and identify faults of various kinds, such as under voltage, over
voltage, reverse polarity, abnormal cycles, and surge suppression.
We installed a remote monitor
(see Power Monitoring below) beside
the battery monitor to tell us about 120 VAC power and 12 VDC battery power at
a glance. So far we have found severe under voltage at one campground and a
reverse polarity extension cord at another campground.
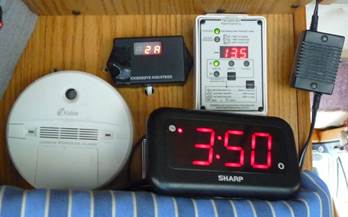 Power
Monitoring. We put the Battery Monitor and the
remote display for the Progressive Industries Power Protection System on the
side of the pantry cabinet. This
allows us to see both the 12 VDC and the 120 VAC status at the same time.
(Photo shows 2 amps on the shore power and the house battery is at 13.5 volts.)
Power
Monitoring. We put the Battery Monitor and the
remote display for the Progressive Industries Power Protection System on the
side of the pantry cabinet. This
allows us to see both the 12 VDC and the 120 VAC status at the same time.
(Photo shows 2 amps on the shore power and the house battery is at 13.5 volts.)
The CO monitor and the power
for the Wilson Dual Band Cellular amplifier are also visible. The alarm clock is easy to set and to
see at night. The remote start
panel for the generator is below the battery monitor. The 12 volt TV is under the striped
cover.
 Onan Generator. Our Roadtrek came “generator
ready.” That meant we had an empty generator compartment, a transfer
switch and the fuel pickup in the gas tank. We called the factory and they strongly advised
against trying to install an Onan. “Too
difficult and too expensive,” they warned, “Buy a
portable.” So we bought a
Honda EU2000i generator, but it was inconvenient to use.
Onan Generator. Our Roadtrek came “generator
ready.” That meant we had an empty generator compartment, a transfer
switch and the fuel pickup in the gas tank. We called the factory and they strongly advised
against trying to install an Onan. “Too
difficult and too expensive,” they warned, “Buy a
portable.” So we bought a
Honda EU2000i generator, but it was inconvenient to use.
We learned that the going
price for a used Onan generator is about $700-800. We found a Roadtrek-owning neighbor who
had added and removed his generator many times; and with his promise to help
use, we went looking for a generator.
We found a used Onan generator removed from a
1997 Roadtrek far away and bought it.
 The
pre-mid 1996 Roadtreks have the generator installed
in a compartment rather than hanging underneath. Although slightly harder to get to (we
timed it – 25 minutes to remove and 45 minutes to reinstall), it is
protected from the elements.
The
pre-mid 1996 Roadtreks have the generator installed
in a compartment rather than hanging underneath. Although slightly harder to get to (we
timed it – 25 minutes to remove and 45 minutes to reinstall), it is
protected from the elements.
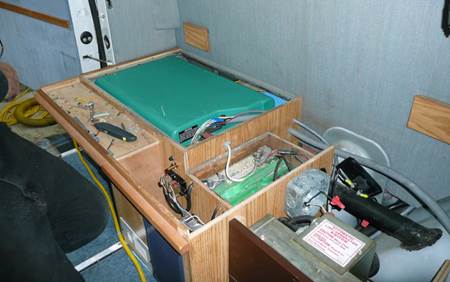
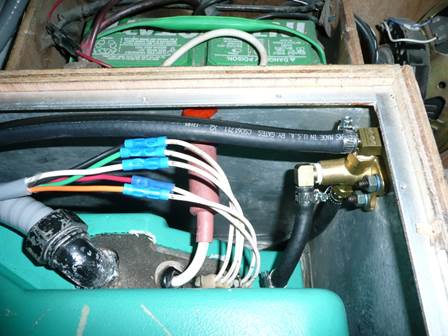
Getting the generator working
correctly turned out to be an unexpected Herculean multi-stage task (see The Onan Saga). An improvement was a dual fuel line, one
side going into the Dodge fuel tank, the other fuel line available to take from
a separate fuel tank. A Y-valve
selects the line (shown in the lower photo). We found some mass loaded vinyl
and lined the generator compartment to reduce operating noise. We mounted the
generator starting panel and runtime meter on the pantry back wall with the
other monitors. For more info on the generators see Onan Generator Basics for Roadtrek Owners. Now that is it done, we are quite happy
with our Onan.
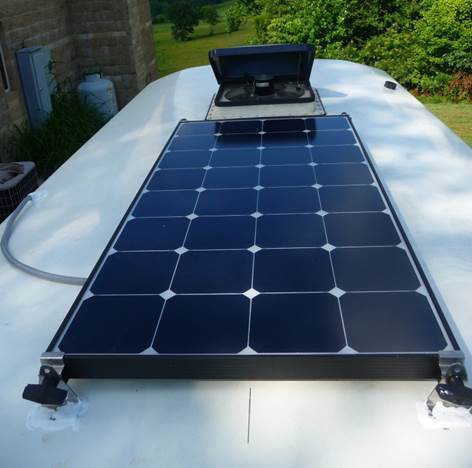 Solar Panel. We don’t boondock for more than
night or two very often. But the
few times a year that we do spend a week without hookups we get tired of
listening to the generator charge the battery. The first 30 minutes, the battery
monitor shows a lot of amps going into the battery. Then it tapers off, and the generator is
loafing along. What a waste!
Solar Panel. We don’t boondock for more than
night or two very often. But the
few times a year that we do spend a week without hookups we get tired of
listening to the generator charge the battery. The first 30 minutes, the battery
monitor shows a lot of amps going into the battery. Then it tapers off, and the generator is
loafing along. What a waste!
We are happy to run the
generator if we need A/C or the microwave or the coffee marker. Solar is perfect for topping off
the battery, and with only a single battery we don’t need much. We are stingy users of power anyway (the
LED lights, and 12 volt TV and 12 volt adapters for the laptops really help
keep power use down). If we use 30
amps in a day that is a lot for us – so one 100 watt solar panel (21
inches x 41 inches) should be plenty.
We discussed what we wanted with
AM Solar – a company highly recommended by other Roadtrek owners. We got their most efficient 100 watt
panel, a Morningstar SunSaver MPPT charge controller
and all the necessary parts and pieces for $696. It took us two half days to install
it. Fishing wires behind cabinets
was the hardest part.
 Remote Meter
for Solar. We already had a battery monitor, but we
couldn’t resist more information so we got a remote meter for the
Morningstar charge controller. Now
we can see how many volts the panel is putting out and how many amps the charge
controller is putting out (among other things). It will not put out more than needed, so
to find out the max it can provide with the sun available, we can increase the
load until the battery monitor changes from amps into the battery to amps being
taken from the battery.
Remote Meter
for Solar. We already had a battery monitor, but we
couldn’t resist more information so we got a remote meter for the
Morningstar charge controller. Now
we can see how many volts the panel is putting out and how many amps the charge
controller is putting out (among other things). It will not put out more than needed, so
to find out the max it can provide with the sun available, we can increase the
load until the battery monitor changes from amps into the battery to amps being
taken from the battery.
The photo shows the
Progressive Industries remote display (shore power) on the left, the
Morningstar remote meter in the middle (reading 19.55 volts at the panel), and
the Trimetric on the right (reading 0.2 amps charging the battery). The CO detector and the Onan control panel are below.
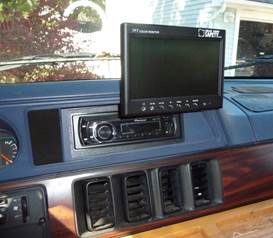
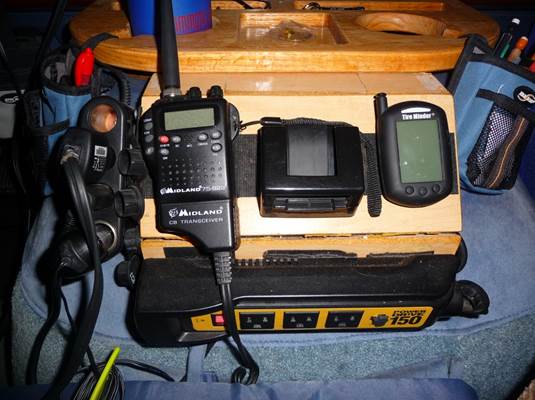 Front
Console. We had too many cigarette
lighter plug-ins and wires trailing around the driver’s and passenger’s
feet, not to mention a small inverter to power laptop computers, and cell phone
chargers. We organized this mess by building a console that slips under and is
screwed to the engine-top tray already in the Roadtrek. It mounts the strip inverter, a four-way
cigarette lighter extension, cell phone holder, and tire monitor
Front
Console. We had too many cigarette
lighter plug-ins and wires trailing around the driver’s and passenger’s
feet, not to mention a small inverter to power laptop computers, and cell phone
chargers. We organized this mess by building a console that slips under and is
screwed to the engine-top tray already in the Roadtrek. It mounts the strip inverter, a four-way
cigarette lighter extension, cell phone holder, and tire monitor
Tire Pressure and Temperature Monitor. We added
a Tire Minder monitor after reading horror stories of big RV flats. The unit
consists in four sensors that screw onto the tire valve stems. Each sensor has a button battery inside.
When you have been traveling for several miles the tire air pressure and
temperature are sent to the display unit on the console.
CB Radio. If you want to learn new and colorful language, get a
citizens band radio and a big antenna. After being stuck in long traffic delays
due to accidents, we bought a
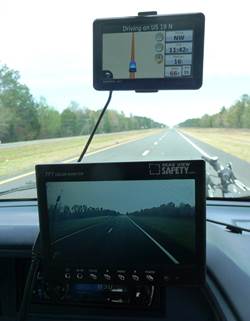
 GPS. We have a
Garmin nuvi GPS unit that can be updated with revised
maps. Every once in a while it says, “Traffic ahead.” Usually when that happens we have
already been sitting in a backup for 20 minutes, or there is absolutely no
slow-down at all. The navigation
part, however, works well.
GPS. We have a
Garmin nuvi GPS unit that can be updated with revised
maps. Every once in a while it says, “Traffic ahead.” Usually when that happens we have
already been sitting in a backup for 20 minutes, or there is absolutely no
slow-down at all. The navigation
part, however, works well.
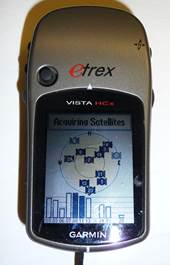
In addition to the vehicle
GPS, we have a hand-held Garmin etrex GPS that we use
for bicycling or boating or hiking.
On the left is the Garmin nuvi with the rear view camera display below. The handheld Garmin etrex
HCx is shown on the right.
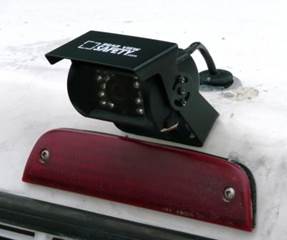 Back Up Camera. There were times having a backup camera
would have been be nice. After
reading many reviews we selected a visual/IR wired camera from Rear View
Safety. We ran the wires into the
A/C compartment, then into the long upper rear storage cabinet and then over
the top of the kitchen cabinets. We
routed it through the shelf over the driver’s door and down inside the
door pillar. It is wired to be on as desired, not just when backing up. Installation description here.
Back Up Camera. There were times having a backup camera
would have been be nice. After
reading many reviews we selected a visual/IR wired camera from Rear View
Safety. We ran the wires into the
A/C compartment, then into the long upper rear storage cabinet and then over
the top of the kitchen cabinets. We
routed it through the shelf over the driver’s door and down inside the
door pillar. It is wired to be on as desired, not just when backing up. Installation description here.
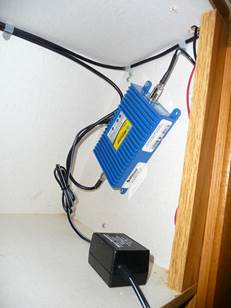 Wilson Dual Band
Amplifier and MiFi. Being cheap, we use Virgin
Mobile prepay MiFi for internet access when traveling
(Sprint network). We can activate
it for 10 days or 30 days as needed.
The Sprint network – at least east of the
Wilson Dual Band
Amplifier and MiFi. Being cheap, we use Virgin
Mobile prepay MiFi for internet access when traveling
(Sprint network). We can activate
it for 10 days or 30 days as needed.
The Sprint network – at least east of the
The trucker antenna
installation is covered in the Exterior Mods section. We mounted the amplifier in the
driver’s side rear cabinet and put the indoor antenna on top of the
closet. We can set the MiFi directly on top of the antenna. Of course it works for cell phones too.
We pull the cord out of the cabinet
and plug the 12 VDC power cord into the TV outlet to power the amplifier. It uses 0.55 amps when turned on.
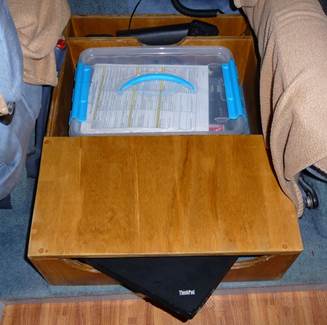
 Computer
Box. We built a box that exactly fits between
the front seats. It has three
compartments. The rearmost
compartment allows you to slide two laptop computers and their power supplies
into an open slot. The second
compartment, with removable lid, contains office supplies – a small
printer, scanner, extra paper, pens, and stapler. The third small compartment is open to
contain charging cords, iPod cords, and other wires. We have foam dog pads that cover the top
of the box and can be placed on the floor to make dog beds when we travel with
2 to 5 Standard Poodles. The box can be covered with one to three dog pads.
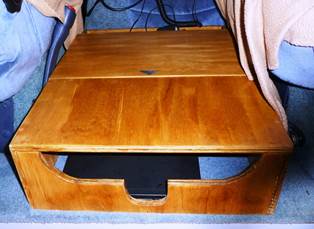
Computer
Box. We built a box that exactly fits between
the front seats. It has three
compartments. The rearmost
compartment allows you to slide two laptop computers and their power supplies
into an open slot. The second
compartment, with removable lid, contains office supplies – a small
printer, scanner, extra paper, pens, and stapler. The third small compartment is open to
contain charging cords, iPod cords, and other wires. We have foam dog pads that cover the top
of the box and can be placed on the floor to make dog beds when we travel with
2 to 5 Standard Poodles. The box can be covered with one to three dog pads.
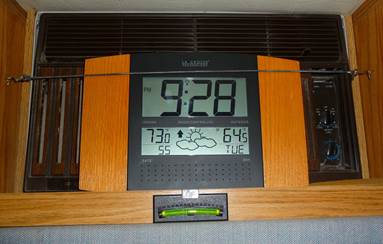 Clocks. We found
a LaCross radio clock that also has an inside and
outside digital thermometer. It
fits in front of the big air conditioner, held in partly by a black elastic
cord. The clock receives WWV radio
signals and adjusts for time zone.
The wireless outside temperature transmitter is located inside the SwingAway box, held on the wall with Velcro fasteners.
Clocks. We found
a LaCross radio clock that also has an inside and
outside digital thermometer. It
fits in front of the big air conditioner, held in partly by a black elastic
cord. The clock receives WWV radio
signals and adjusts for time zone.
The wireless outside temperature transmitter is located inside the SwingAway box, held on the wall with Velcro fasteners.
We also have a large
red-number digital clock facing the sleepers in the back. It is a SHARP alarm clock from
Walmart. It sits atop the 13”
TV cover, secured by Velcro fasteners.
Shown above in Power Monitoring.
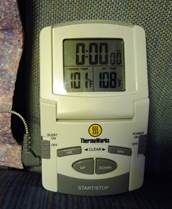 Water Heater Temperature Thermometer. We found
a meat thermometer with settable alarm.
We bought a probe with an extra long wire for
it so we could mount the display on the clothes cabinet wall. The probe was inserted beneath the foam
insulation jacket of the Suburban water heater, and plugs into a digital
display. The water heater, when activated on the Roadtrek panel, heats water to
a high shutoff temperature – higher than necessary for doing dishes or
showering. And it wastes water
getting the mixture set for the correct temperature. So we set the thermometer to alarm at a setpoint of 109 to 112◦F, at which point we turn off
the water heater at its “hot enough” point to save propane. This means we can do dishes or take a
shower turning on only the hot water.
No fiddling with adjusting the water temperature. You may have to experiment to find a
temperature setting that works for you.
Water Heater Temperature Thermometer. We found
a meat thermometer with settable alarm.
We bought a probe with an extra long wire for
it so we could mount the display on the clothes cabinet wall. The probe was inserted beneath the foam
insulation jacket of the Suburban water heater, and plugs into a digital
display. The water heater, when activated on the Roadtrek panel, heats water to
a high shutoff temperature – higher than necessary for doing dishes or
showering. And it wastes water
getting the mixture set for the correct temperature. So we set the thermometer to alarm at a setpoint of 109 to 112◦F, at which point we turn off
the water heater at its “hot enough” point to save propane. This means we can do dishes or take a
shower turning on only the hot water.
No fiddling with adjusting the water temperature. You may have to experiment to find a
temperature setting that works for you.
 12VDC TV. Many Roadtreks
have large TVs that run from inverter-supplied 120 VAC. At a truck stop we saw 12 VDC TVs of
various sizes and several brands. A TV designed for trucks is made to handle
rough travel and road shocks, voltage variations, and be loud enough to be
heard over diesel engines. And it
works directly from battery power.
12VDC TV. Many Roadtreks
have large TVs that run from inverter-supplied 120 VAC. At a truck stop we saw 12 VDC TVs of
various sizes and several brands. A TV designed for trucks is made to handle
rough travel and road shocks, voltage variations, and be loud enough to be
heard over diesel engines. And it
works directly from battery power.
After reading reviews we
bought a Skyworth from Roadtrucker.com.
Our 13.3 inch model with a built in DVD player uses only 1.5 amps
playing a DVD. We selected the
13.3” model so it would site flat against the pantry cabinet wall. We are not TV snobs, but have been very
happy with it. We bought a mounting
arm to swing it away from the wall or point it forward. We made a slipcover to protect it. When plugged into the Roadtrek TV
antenna in our town it picks up 11 TV stations.
(Above the TV is the CO
Detector and the Battery Monitor)
The TV plugs into the original 12 VDC TV outlet. The cable and antenna connections are
next to the power plug.
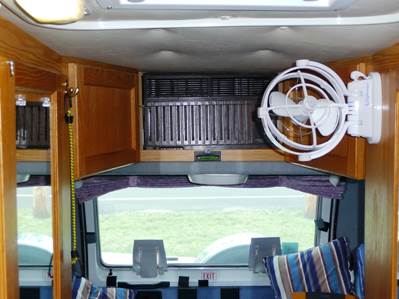
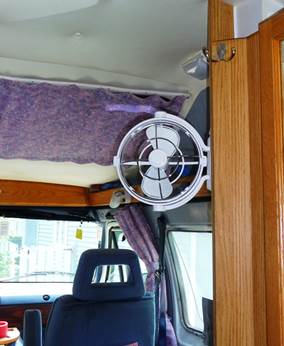
Front & Rear Fans. On hot
days a fan to blow the A/C back into the dinette / bed area is required. And a front fan to move vehicle A/C down
to the dogs while moving keeps them comfortable.
These Caframo
Sirocco 12 VDC fans were purchased from a marine store. They are fully gimbaled and can direct
air anywhere. They have 3 speeds
and can be set to run for 2, 4, 6, or 8 hours. They are wired into the house battery.
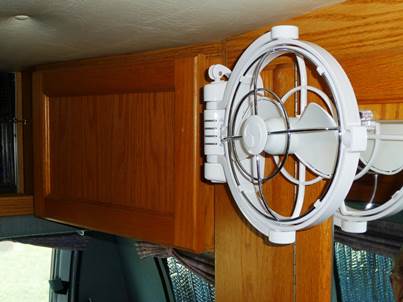
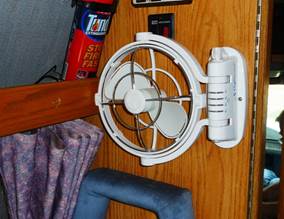 The Sirocco fans will stow flat against the wall. The rear fan can be rotated over the
pantry cabinet door or the rear storage compartment door. They are quiet and perform well. And they are out of the way when not needed.
The Sirocco fans will stow flat against the wall. The rear fan can be rotated over the
pantry cabinet door or the rear storage compartment door. They are quiet and perform well. And they are out of the way when not needed.
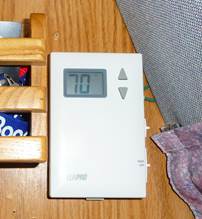 Replacement
Thermostat. Our
original Suburban thermostat finally died and we replaced it with a Luxpro digital thermostat (heat only) we found on
Amazon. We find that the digital
display is useful even when using an electric heater or the A/C. A quick look is all that is needed. And pushing either button will turn on a
green backlight for about 10 seconds, so it can be read at night without
turning on a light.
Replacement
Thermostat. Our
original Suburban thermostat finally died and we replaced it with a Luxpro digital thermostat (heat only) we found on
Amazon. We find that the digital
display is useful even when using an electric heater or the A/C. A quick look is all that is needed. And pushing either button will turn on a
green backlight for about 10 seconds, so it can be read at night without
turning on a light.
The new thermostat does a
better job of maintaining the temperature than the original. Originally it seemed to go from too cold
to too hot. Now it range is from
slightly cool to slightly warm.
Unfortunately we never measured the temperatures on the original, so we
have no way to compare. But we
don’t find ourselves throwing off blankets because it got too hot, or
hiding under the covers because it got too cold.
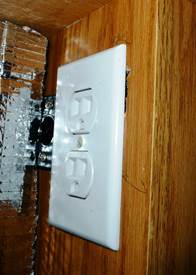
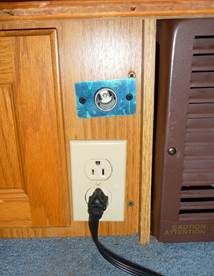 Extra Outlets.
We installed extra 120 VAC outlets and 12 VDC outlets on both sides of the rear
bench seats/beds. These allow
various appliances to work without draping cords everywhere. We also installed a 12 VDC outlet behind
the driver for the MiFi.
Extra Outlets.
We installed extra 120 VAC outlets and 12 VDC outlets on both sides of the rear
bench seats/beds. These allow
various appliances to work without draping cords everywhere. We also installed a 12 VDC outlet behind
the driver for the MiFi.
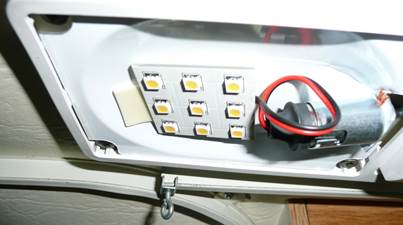
 LED Replacement Bulbs. Several
years ago, we replaced the bulbs in all the incandescent lights in Red Rover
with LEDs units from SuperBrightLEDs.com.
LED replacement bulbs can even be found in Camping Stores today.
LED Replacement Bulbs. Several
years ago, we replaced the bulbs in all the incandescent lights in Red Rover
with LEDs units from SuperBrightLEDs.com.
LED replacement bulbs can even be found in Camping Stores today.
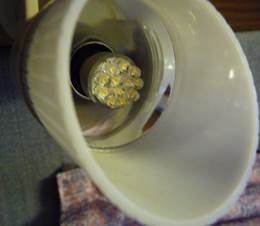
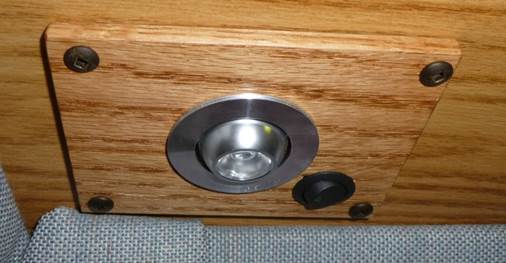 Replacement Reading Lights. The white plastic bullet lights shown
above worked fine, but we were always bumping them with our heads. We kept looking for some low profile
replacements that we could still aim.
Eventually we stumbled across these. They are 1 watt LED lights and seem to
be plenty bright for reading.
Replacement Reading Lights. The white plastic bullet lights shown
above worked fine, but we were always bumping them with our heads. We kept looking for some low profile
replacements that we could still aim.
Eventually we stumbled across these. They are 1 watt LED lights and seem to
be plenty bright for reading.
The mounting hole was
smaller, so we replaced the oak piece that held the lights and added a switch
too.
 Dinette Strip Lights. When boondocking we don’t use the fluorescent light over
the table because it uses 1.5 amps (same as the Fantastic Fan on medium or the
13” Skyworth TV playing a DVD).
That is excessive compared to LED lights, but the 2 reading lights
don’t light the table very well.
Dinette Strip Lights. When boondocking we don’t use the fluorescent light over
the table because it uses 1.5 amps (same as the Fantastic Fan on medium or the
13” Skyworth TV playing a DVD).
That is excessive compared to LED lights, but the 2 reading lights
don’t light the table very well.
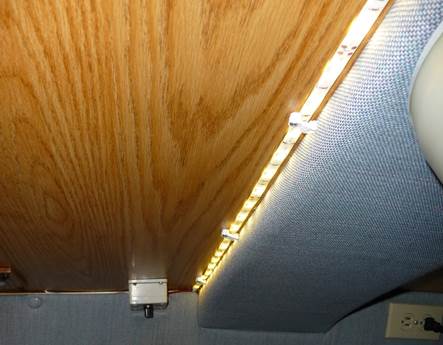
We were happy with the other
LED strip lights we use, so we ran a strip across the ceiling behind the fabric
covered support. They are not
visible from front. We included a
dimmer (box on ceiling) since these lights can be very bright. They can be as bright as the fluorescent
light or dialed down for a romantic dinner.
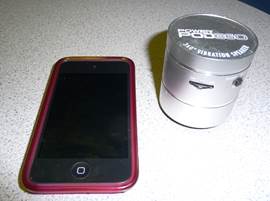 Tiny
Computer Speaker. This little speaker is called a 360
degree vibration speaker. It has a
battery that charges though a USB connection and is quite an impressive
speaker. It makes a huge difference
what you set it on. We have found
it does a great jobs sitting on the dinette table. And it fits perfectly in the “Oak
Occasional Shelf” we got from Camping World (we have two on the side of
the clothes cabinet near the thermostat.
Tiny
Computer Speaker. This little speaker is called a 360
degree vibration speaker. It has a
battery that charges though a USB connection and is quite an impressive
speaker. It makes a huge difference
what you set it on. We have found
it does a great jobs sitting on the dinette table. And it fits perfectly in the “Oak
Occasional Shelf” we got from Camping World (we have two on the side of
the clothes cabinet near the thermostat.
The speaker works well with
both the laptops and the iPods.
 Walkie Talkie
Two-Way Radios. We carry two portable short-range radios
for use when one of us is away shopping.
They are useful when it’s raining to summon the Roadtrek from far
out in the parking lot to the store door at the right time to intercept the
shopper. Very valuable for finding your
spouse in a big box store. They can
also be used for directing backing into campsites.
Walkie Talkie
Two-Way Radios. We carry two portable short-range radios
for use when one of us is away shopping.
They are useful when it’s raining to summon the Roadtrek from far
out in the parking lot to the store door at the right time to intercept the
shopper. Very valuable for finding your
spouse in a big box store. They can
also be used for directing backing into campsites.
Home Kitchen
Bathroom Organization
& Storage